
how to make a knife sharpening angle guide
Maintaining a consistent angle is crucial for achieving a sharp edge; guides simplify this process‚ especially for beginners.
They ensure precision‚ mirroring techniques shown in online resources and kits.
Sharpening without the correct angle leads to dullness or damage‚ while guides‚ like cardboard templates‚ offer accessible solutions.
Why Use an Angle Guide?
Achieving a consistently sharp knife edge relies heavily on maintaining the correct sharpening angle throughout the process. Without an angle guide‚ replicating this angle accurately can be incredibly challenging‚ even for experienced users. Angle guides eliminate guesswork‚ providing a reliable reference point for beginners and seasoned sharpeners alike.
DIY guides‚ like those crafted from cardboard or wood‚ offer a cost-effective alternative to commercially available options. These guides ensure uniform sharpening‚ preventing uneven wear and maximizing the knife’s lifespan. Resources online demonstrate how these simple tools can dramatically improve sharpening results‚ mirroring the precision of professional kits and techniques.
Ultimately‚ using an angle guide translates to safer‚ more efficient cutting and a longer-lasting‚ sharper blade.
Understanding Knife Sharpening Angles
Knife sharpening angles dictate the blade’s durability and sharpness. Lower angles (15-20 degrees) create a razor-sharp edge‚ ideal for delicate tasks like filleting‚ but are more prone to chipping. Higher angles (25-30 degrees) offer greater robustness‚ suited for heavy-duty cutting and outdoor use‚ though with slightly reduced sharpness.
Kitchen knives typically benefit from a 20-25 degree angle‚ balancing sharpness and durability. When constructing a DIY angle guide‚ accurately replicating these angles is paramount. Online resources and templates can assist in precise angle measurement‚ ensuring your guide supports the desired edge geometry.
Choosing the correct angle‚ and consistently maintaining it‚ is key to optimal knife performance.

Types of Knife Sharpening Angle Guides
Various guides exist‚ from fixed systems offering simplicity to adjustable ones for versatility. Magnetic and cardboard templates provide cost-effective solutions‚ aiding consistent sharpening angles.
DIY guides often mimic these designs‚ utilizing wood and readily available materials.
Fixed Angle Guides
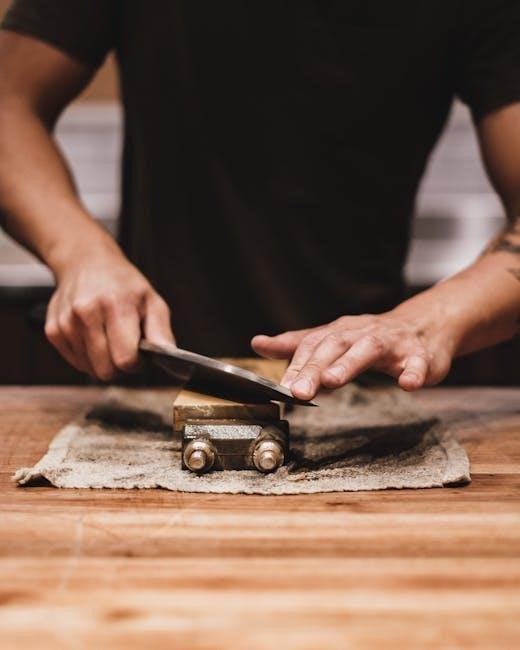
Fixed angle guides present a pre-determined sharpening angle‚ simplifying the process for users. These are often constructed from wood or plastic‚ featuring a rigid structure that holds the blade at a specific inclination. DIY versions commonly employ two pieces of wood joined at the desired angle‚ creating a stable support for the knife during sharpening.
Construction involves precise cuts to ensure accuracy‚ with the angle typically ranging from 20 to 30 degrees for general-purpose knives. Securing the blade within the guide is crucial‚ often achieved through clamping or a snug fit. While less versatile than adjustable guides‚ fixed systems excel in ease of use and consistent results‚ particularly for beginners learning proper technique.
Adjustable Angle Guides
Adjustable angle guides offer versatility‚ allowing users to customize the sharpening angle to suit different knife types. DIY designs often incorporate a hinged mechanism or a series of slots to accommodate varying blade inclinations. These guides typically consist of a base and an adjustable support‚ enabling precise angle selection.
Construction may involve using metal brackets or wooden joints to create a secure and adjustable system. Fine-tuning the angle is essential for optimal sharpness‚ requiring careful measurement and adjustment. While more complex to build than fixed guides‚ adjustable systems provide greater flexibility‚ catering to a wider range of knives and sharpening needs.
Magnetic Angle Guides
Magnetic angle guides represent a more advanced approach to DIY construction‚ utilizing the power of magnets to secure the blade at the desired angle. These guides typically involve embedding small‚ strong magnets within a wooden or plastic structure. The magnets firmly hold the knife blade against the sharpening surface‚ ensuring consistent contact.
Creating such a guide requires precise placement of the magnets and a stable base. While more challenging to build‚ magnetic guides offer excellent stability and ease of use. They eliminate the need for clamping or manual holding‚ allowing for a smoother and more controlled sharpening process‚ enhancing precision.
Cardboard/Paper Template Guides
For the most budget-friendly and accessible DIY angle guide‚ cardboard or paper templates are an excellent starting point. This method involves drawing the desired sharpening angle directly onto the material‚ creating a visual reference during the sharpening process. Simply sketch the angle – 20 degrees for kitchen knives‚ for example – and position it near your sharpening stone.
The knife’s edge is then guided along the drawn line‚ ensuring a consistent angle is maintained throughout the sharpening stroke. While less precise than other methods‚ this technique is surprisingly effective and requires minimal tools or materials‚ making it ideal for beginners.

Materials Needed to Make a DIY Angle Guide
Essential supplies include wood (plywood or hardwood)‚ fasteners like screws or glue‚ and tools for angle measurement – a protractor or angle finder are key.
These components enable construction of a stable‚ accurate guide for consistent sharpening‚ as demonstrated in various online tutorials.
Wood Selection (Plywood‚ Hardwood)
Choosing the right wood is fundamental for a durable and effective DIY angle guide. Plywood offers affordability and stability‚ making it a good starting point for beginners‚ but hardwood provides superior longevity and resistance to wear.
Hardwoods like maple‚ oak‚ or walnut are ideal for guides intended for frequent use‚ as they withstand repeated clamping and pressure during sharpening. Consider the plywood thickness – ½ inch or greater is recommended for sufficient rigidity.
Regardless of your choice‚ ensure the wood is free of knots or significant imperfections that could compromise the guide’s accuracy. Smooth surfaces are also preferable for better contact and stability during sharpening‚ mirroring professional kits.
Fasteners (Screws‚ Glue)
Securely joining the wooden components requires appropriate fasteners. Wood screws are highly recommended for their strength and ability to create a lasting bond‚ especially when constructing the guide’s frame and angle support.
Choose screws with a length suitable for the wood thickness‚ preventing them from protruding. Wood glue‚ used in conjunction with screws‚ enhances stability and distributes stress‚ mirroring the construction of quality sharpening tools.
Ensure the glue is specifically designed for wood and apply it evenly to the joining surfaces. Clamps are essential while the glue dries‚ guaranteeing a tight and accurate assembly‚ similar to professionally made guides.
Angle Measurement Tools (Protractor‚ Angle Finder)
Accuracy is paramount when crafting an angle guide; therefore‚ reliable measurement tools are essential. A protractor allows for precise angle marking on the wood pieces‚ ensuring the guide supports the desired sharpening angle.
Alternatively‚ an angle finder‚ particularly a digital one‚ offers even greater precision and ease of use. These tools quickly and accurately measure existing angles or transfer them to the wood‚ streamlining the construction process.
Double-checking measurements with both a protractor and angle finder is recommended‚ guaranteeing the final guide delivers consistent and repeatable sharpening results‚ akin to professional sharpening systems.

Building a Basic Wooden Angle Guide
Begin by cutting wood pieces to the desired dimensions‚ then assemble a stable structure; Securely attach an angled support‚ referencing measured angles for consistent sharpening.
This simple design‚ utilizing readily available materials‚ provides a foundation for controlled blade sharpening.
Cutting the Wood Pieces
Precise cuts are paramount when constructing your wooden angle guide. Begin by determining the dimensions needed for the base and angled support pieces. A common approach involves a rectangular base and two triangular supports to establish the sharpening angle.
Utilize a saw – a hand saw or power saw will suffice – to carefully cut the wood according to your measurements. Accuracy is key; slight deviations can impact the guide’s effectiveness. Ensure the cuts are clean and straight for a snug fit during assembly.
Consider the wood thickness; thicker wood provides greater stability. Sanding the edges after cutting will remove splinters and create a smoother surface for assembly and use.
Assembling the Guide Structure
With the wood pieces accurately cut‚ begin assembling the guide’s framework. Start by attaching the angled support pieces to the base. This is best achieved using wood glue and screws for a robust connection. Ensure the supports are positioned symmetrically to maintain consistent sharpening angles on both sides of the blade.
Apply glue liberally to the contact surfaces‚ then secure with screws. Pre-drilling pilot holes prevents the wood from splitting. Clamp the pieces together while the glue dries for maximum strength.
Double-check the alignment of the supports; they should form a stable “V” shape to guide the knife blade during sharpening.
Securing the Angle Support
To ensure stability and accuracy‚ reinforce the angle supports with additional fasteners. Consider adding small wooden cleats or brackets to the base‚ providing extra support where the angled pieces meet. This prevents shifting during sharpening‚ crucial for maintaining a consistent edge.
Apply a bead of wood glue along the joints before screwing in the cleats. Countersink the screws to create a flush surface‚ avoiding interference with the knife blade.
Finally‚ thoroughly inspect the structure for any wobble or weakness. A solid‚ well-secured angle support is paramount for effective and safe knife sharpening.

Advanced Angle Guide Features
Enhance your DIY guide with non-slip material for stability‚ or design a universal holder accommodating various blade shapes and sizes.
Integrating a stone holder adds convenience.
Adding Non-Slip Material
To prevent your wooden angle guide from sliding during sharpening‚ incorporating non-slip material is essential. Several options work effectively‚ including rubber feet‚ thin rubber sheeting‚ or even specialized non-slip pads commonly used under rugs.
Apply adhesive-backed rubber feet to the base of the guide for a simple solution. Alternatively‚ cut rubber sheeting to the shape of the guide’s base and secure it with strong adhesive. This provides a larger surface area of grip.
Ensure the adhesive is compatible with both the wood and the rubber material. A secure bond is vital for safety and consistent sharpening results. This addition significantly improves stability‚ especially on smooth work surfaces.
Creating a Universal Guide for Different Knives
Designing a truly universal angle guide requires accommodating varying blade widths and thicknesses. A wider base with adjustable supports is key. Consider incorporating multiple slots or grooves along the guide’s length‚ allowing for different knife sizes to fit securely.
Implement adjustable side supports that can be tightened or loosened to hold the blade firmly in place‚ regardless of its width. These supports should be lined with a soft material‚ like felt‚ to prevent scratching the blade.
The angle support itself should also be adjustable‚ allowing for quick changes to accommodate different knife types and desired sharpening angles. This adaptability maximizes the guide’s usefulness.
Incorporating a Stone Holder
Integrating a stone holder into your DIY angle guide significantly enhances its functionality. A recessed platform‚ sized to accommodate common sharpening stone dimensions‚ should be built into the guide’s structure. This platform needs to be stable and prevent the stone from shifting during use;
Consider adding a lip or edge to the platform to keep the stone securely in place. Alternatively‚ small‚ adjustable clamps can be incorporated to hold the stone firmly. Ensure the stone surface is flush with the guide’s angle support for consistent sharpening.
A well-designed stone holder streamlines the sharpening process‚ making it more efficient and accurate.

Testing and Adjusting Your Angle Guide
Verify the angle with a protractor‚ then test on an expendable blade. Fine-tune adjustments are vital for optimal sharpening‚ ensuring consistent results and a keen edge.
Checking the Accuracy of the Angle
Precisely verifying your DIY angle guide’s accuracy is paramount before sharpening valuable knives. Utilize an angle finder or protractor‚ carefully aligning it against the guide’s support surface. Compare the measured angle with your desired sharpening angle for the specific knife type – remember‚ kitchen knives typically require 20-25 degrees.
Alternatively‚ a simple test involves lightly marking the knife blade with a permanent marker at the intended sharpening angle. Then‚ draw the blade across the stone using the guide. If the marker is evenly removed‚ the angle is correct. Uneven removal indicates a need for adjustment. Consistent checks ensure optimal sharpening performance.
Fine-Tuning for Optimal Sharpening
After initial accuracy checks‚ fine-tuning your DIY angle guide is essential. Minor adjustments to the angle support can significantly impact sharpening results. If the blade feels rounded or doesn’t achieve a sharp edge‚ slightly decrease the angle. Conversely‚ if the edge chips easily‚ increase the angle incrementally.
Experimentation with different knives is key. Each blade geometry responds uniquely. Observe the metal removal during sharpening; consistent‚ even removal indicates a well-tuned guide. Remember‚ achieving a razor-sharp edge requires patience and iterative adjustments. Prioritize safety and controlled movements throughout the process.

Common Knife Angles and Their Uses
Different knives require varying angles; 15-20° for razors‚ 20-25° for kitchen knives‚ and 25-30° for heavy-duty blades.
A guide helps achieve these precise angles consistently.
15-20 Degree Angle (Razor Blades‚ Fillet Knives)
For extremely sharp edges‚ like those found on razor blades and fillet knives‚ a 15-20 degree angle is paramount. Achieving this delicate angle consistently by hand is exceptionally difficult‚ making an angle guide invaluable. A precise guide ensures the blade maintains its intended sharpness for clean‚ effortless cuts.
When constructing a DIY guide‚ meticulous attention to this narrow angle is vital. Cardboard templates or carefully angled wooden supports must be accurate to prevent rounding the edge or creating an ineffective bevel. Remember‚ these blades demand finesse‚ and a reliable guide delivers that.
20-25 Degree Angle (Kitchen Knives)
Kitchen knives typically benefit from a 20-25 degree angle‚ striking a balance between sharpness and durability. This range allows for effective slicing‚ dicing‚ and chopping without the edge becoming overly fragile. A DIY angle guide for kitchen knives should prioritize stability and ease of use‚ as these are frequently sharpened tools.
When building your guide‚ consider a design that accommodates various kitchen knife sizes. Adjustable guides are particularly useful here. Ensuring the angle remains consistent throughout the sharpening stroke is key‚ preventing uneven wear and maintaining optimal performance. Precision is vital for long-lasting sharpness.
25-30 Degree Angle (Heavy-Duty Knives‚ Outdoor Knives)
Heavy-duty and outdoor knives demand a more robust edge‚ typically maintained at a 25-30 degree angle. This steeper angle enhances the blade’s resilience‚ crucial for tasks like batoning wood or processing game. A DIY angle guide for these knives needs to be exceptionally sturdy to withstand the pressure applied during sharpening.
When constructing your guide‚ prioritize a solid base and secure angle support. Consider incorporating a non-slip material to prevent movement during use. Accuracy is paramount; a slight deviation can compromise the blade’s strength and performance in demanding situations. Reinforce the structure for longevity.

Maintaining Your Angle Guide
Regular cleaning prevents debris buildup‚ ensuring accurate angle support. Inspect for wear and tear‚ tightening fasteners as needed to preserve precision and longevity.
Proper storage protects against damage‚ extending the guide’s lifespan and maintaining consistent sharpening results over time.
Cleaning and Storage
After each sharpening session‚ thoroughly clean your DIY angle guide to remove metal filings and abrasive particles. A soft brush and a damp cloth are ideal; avoid harsh chemicals that could damage the wood or any non-slip materials you’ve added.
Ensure the guide is completely dry before storing it. This prevents mold growth‚ especially in wooden guides. Store it in a dry‚ stable location‚ away from extreme temperatures or humidity. A dedicated drawer or shelf is perfect.
Protecting the guide from impacts will prevent damage to the angle support. Consider wrapping it in a cloth or storing it within a protective case when not in use‚ ensuring its continued accuracy and usefulness.
Inspecting for Wear and Tear
Regularly inspect your homemade angle guide for any signs of damage. Check the angle support for cracks‚ chips‚ or loosening fasteners. Examine any non-slip material for wear‚ ensuring it still provides adequate grip during sharpening.
Pay close attention to the wood itself‚ looking for warping or splitting. If the guide’s accuracy seems compromised‚ test it against a known angle using a protractor or angle finder.
Address any issues promptly. Tighten loose screws‚ re-glue any separating parts‚ or replace worn components. Maintaining your guide ensures consistent sharpening results and extends its lifespan‚ saving you time and effort.